
Hi all.
I've been on this mission for over two years and would like to complete both it and the one after it to complete Chains of Promathia.
I am a 75 Black Mage and have found a 75BLU/75BLM and a 75BLM/75SAM. However, I'm not sure if those are good job combos for this fight (and next, but I'm focusing on 8-3 for the time being anyways). Then again, I'm not even sure what is.
I am sure that I want to take care of this mission (and hopefully the one thereafter) ASAP. Ideally, as soon as this weekend at a scheduled time (once I've found 5 others that can help me - 3 others if you count the 75BLM/75BLU and 75BLM/75SAM above). I'd like at least one of the people in my party to have successfully completed this mission before. I've attempted this Mission twice before and its pretty brutal just to get to the fight itself, so I want an experienced member to help out. I also am looking for people interested in doing this fight until we succeed, even if that means repeated death and what not.
If you can help out on this mission and are interested, please let me know so I can add you to the list and get this mission on its way. Please list what 75 jobs you can bring.
PM 8-3 When Angels Fall
|
Mission OrdersThe Gate of the Gods--the portal leading to the highest level of the palace--has opened. While your companions scramble to reach the audience chamber, you must find which of the five towers will return you into the light... WalkthoughImportant to note first and foremost: This entire mission (up to the Burning Circle fight) is possible to do soloable without any deaths. The mission itself can be divided into three parts, and can therefore be done all at seperate times. These are:
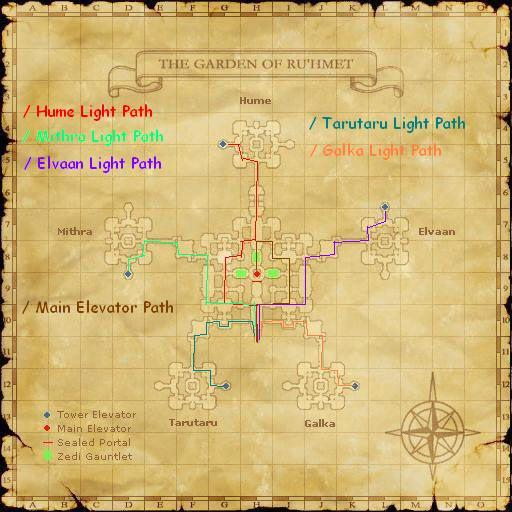
Therefore, each will be delt with seperately. Retrieving the LightIt is possible to solo this part, but Reraise is a very good idea no matter what. Also be sure to have either Escape or a Warp Scroll in order to get out of Ru'hmet, once you get your Light back. For each race, the maps shown show the path that each race must take to get their invididual race's Light back. No race may get a Light from another race's tower. The "S" indicates the Starting Elevator, and the "E" indicates the Ending Elevator. The Lights are on the Fourth Floor. For the first and second floors of the towers, the corner rooms each have a fast-spinning pot inside of a cubby-hole. It is possible to sneak by these without aggro, provided that you run across when the BIG EYE is facing towards you. If you get aggro, it is possible to Sleep and/or Bind the pot in place while running to the Elevator.
The third floor is rather easy, although there are still pots to becareful of in the corners in the cubby-holes. There are also Ghrah balls to watch out for here, but those should pose no problem as long as you be sure to pass by them while they are in the disco-ball formation.
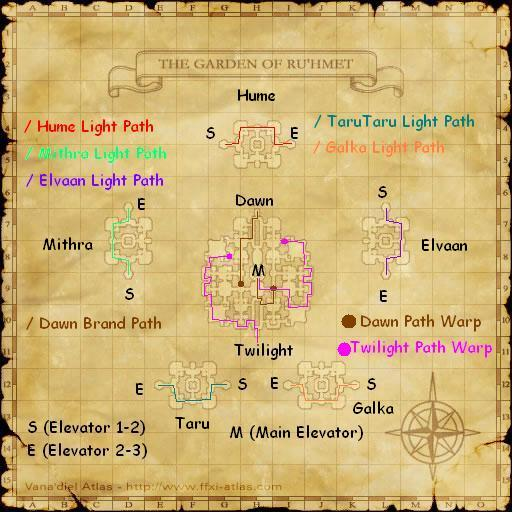
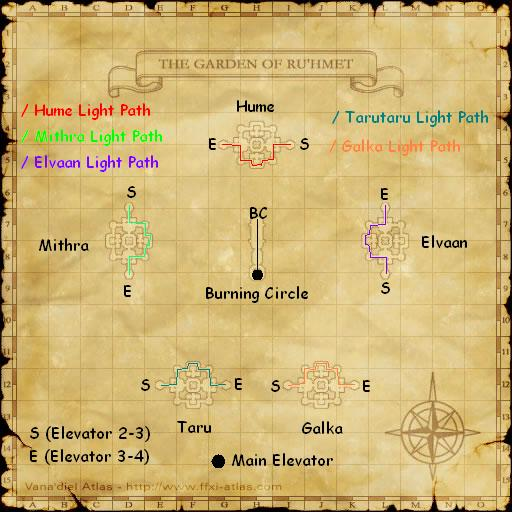
The fourth floor has no monsters on it, and instead has a clear-cut path that leads directly to the Ebon Panels which you will need to examine twice. The first time, you will get a moderately lengthy Cutscene. The second time, you will apply your Mysterious Amulet to the Ebon Panel and get your Light back. At this point, either Escape or Warp out, and re-enter the Garden of Ru'hmet. Getting both BrandsIt is also possible to solo this part, but Reraise is a very good idea no matter what. For this, you must get to the Main Elevator. This will prove tricky, as the three open pathways (East, North, and West) all have a pathway that is blocked by a room full of spinning pots that will shut the door behind you if you manage to aggro them. For the East and West pathways, there is always one pot that will be spinning super-fast, making it impossible to get past it without aggro. The North pathway however, has all four pots spinning slowly and is therefore the best pathway to take. To pass by with no aggro, pick a side of the room and run past the pots as the BIG EYE is about to turn to face you. If you run on one side of the room, the other side's pots won't be within aggro range, so you won't have to worry about them. If you get aggro, just die against the opposite side, and Reraise when it is safe. Once you are at the Main Elevator, you will find that you can only go Up...so go up! You are now on the second floor. -Brand of Twilight- Follow the pathway marked on the Map to get to it. At the Warp, you simply run through it and it will automatically port you to the other side. It is -very- important to note that with a recent patch, hate will be kept on a mob while running through the warps. Along this pathway, the only real problem is the Ghrahs, but those can be easily avoided as long as they are in the disco-ball mode. Once you get to the end, click on the Cermet Portal, say "Yes" and get a Cutscene. Once the cutscene is over, you will receive the Brand of Twilight key item. -Braind of Dawn- Follow the pathway marked on the Map to get to it. At the Warp, you simply run through it and it will automatically port you to the other side. It is -very- important too note that with a recent patch, hate will be kept on a mob while running through the warps. Along this pathway, there is only one group of Ghrahs that have to be dodged. Once you get to the end, click on the Cermet Portal, say "Yes" and get a Cutscene. Once the cutscene is over, you will receive the Brand of Dawn key item. At this point, go back to the Elevator, and go Up it once more to the Third Floor. The Burning Circle FightOnce you are on the Third Floor, touch the gate for a cutscene. Afterwards, touch it again in order to enter into the BC fight. Medicines to bring along: Reraise with multiple charges, Echo Drops, Antidotes, and Icarus Wings. Sleeping potions and Opo-Opo necklaces are optional for sleeping TP during the fight itself if you wipe. First and foremost to note: Carrying in TP might have been possible before. However, the all buffs (except food and item RR) and TP are lost upon entering the BC fight. There are three job requirements for this fight. First is a high-level sleeper. For this fight, a Black Mage can ES Sleepga II the pots, putting them to sleep. Lullaby, while possible, is not anywhere near as effective. A Red Mage with a strong Sleeping setup can work also. Second, is a job that can dispel. This is necessary for Ice Spikes and Defense boost. Third, a job that can take care of Petrification. This fight has a 30 minute time limit. The Burning Circle fight itself consists of four blue Zdei pot NMs. The two smaller ones are Black Mage (the further two at the fight's start), and the two bigger ones are Red Mage (the closer two at the fight's start). When you enter into the fight, you will be put at the OPPOSITE SIDE of the entrance, meaning that to run away from the fight you have to first cross the room completely. Also to note is that you want to kill the Black Mage pots first, before the Red Mage ones. The Black Mage ones cast stronger spells, and therefore pose the biggest threat. The mobs themselves have various moves, as listed below: All Ix'Zdeis Reactor Cool - Ice Spikes, Defense Boost. Dispel it twice. Reactor Overheat - AoE Plague and damage, fire-based. Reactor Overload - AoE Silence and damage, wind-based Decayed Filament - AoE Poison, damage Static Filament - AoE Stun, damage Optic Induration - Frontal AoE petrification, the damage received related to damage dealt to the pot while it was charging BLM Pots All tier-3 -ga spells. All tier-4 attack spells. All ancient magic. RDM Pots All tier-3 attack spells. Dispelga. Bindga. Silencega. When you enter into the fighting arena, there will be four pots, two on each side. The moment you move forward, all four pots will automatically aggro. Important to note is that if any of the pots return to their original pedastal during the fight, their HP will be automatically filled back up. Often times, when a pot starts to low health, they will start to move directly back to their pedastal, leaving you with about five to ten seconds to finish them off. It is therefore advisable to not hold back once a pot gets low on HP in order to quickly kill it before it can heal itself. The -ga spells: The room that the fight takes place in is too small to really outrun them, so be careful for mages to stay out of range of the spell when it goes off. Stunning moves such as the Stun spell, Shield Bash, or various stunning Weapon Skills do work to stop the magic being cast. For this fight, I did it with PLD/WAR, MNK/WAR, RDM/BLM, WHM/BRD, RNG/NIN, and BLM/WHM, and we were all at 75. At the fight's start, the Black Mage popped Elemental Seal. As soon as he did that, the PLD went forward and aggroed all four pots. Important to note is that before leaving their platforms, all four pots will cast some sort of magic spell, so make sure the healer is ready. Once the enemies are clumped together, sleep the four pots with Sleepga (I or II, depending on what you have). At this point, the PLD voked a BLM pot, dragged it away some, and the melee /assist him and start to kill the pot as fast as possible with whatever means are at hand. At this point, the Red Mage got prepared to do a secondary Sleep of the pots, standing with the WHM and BLM near the door. The pots woke up, the Red Mage would ES+Sleepga them to keep them asleep for abit longer. One both of the BLM pots were dead, the melee and tank then focused on each of the RDM pots, until they were both defeated. There is a common strategy involved, where you can wipe after the first couple pots, Reraise, wait for weakness to wear, and go after the last two pots. If you do this, it is highly suggested that at the start of the fight, you run to the opposite side of the battle arena and stay close to there while fighting the BLM pots. That way, when you wipe, the RDM pots will go back to their resting spots at what will now be the FAR two pedastals, giving you some breathing room to tractor people over to raise and lose weakness. I have done this burning circle fight multiple times now, and both methods are fairly consistant. The most important thing for both however is FIGHT THE BLACK MAGE POTS FIRST. Once the BC is over, move ahead and click on the Luminous Convergence for a long (but awesome) cutscene. After this, exit to Al'tieu, go straight back into Garden and pass through what was previously the locked Southern Door, and take the Elevator.
Mission Series
Categories: Final Fantasy XI | FFXI Mission This page last modified 2009-04-25 09:26:18. | ||||||||||||||||||||||||||||||||||||||
| Send a correction | |||||||||||||||||||||||||||||||||||||||
Scholar
44 posts
You're a moron. Learn to type and spell.

After a long evening of getting my Light of Holla back (was with 4 others who wanted to fight everything along the way...bad idea), I decided to solo the run for the Brands, on my Blm75/whm37. Maps here are very good and accurate.
Ended up dying 4 times. The first was expected, getting through the 4 pot room. Put up stoneskin/aquaveil, ran into room and threw a sleepga 2, which slept 3 of the pots (would have gotten all of them, except I did not use ES nor did I check to see that it was lightday, unfortunately). Gave me enough time to get to the far door, target and click it, and die there, since I was not really interested in trying to take out the pots, just to die in a convenient place. No problem with aggro on raise (waited about 10 seconds, door opened, raised and ran through).
Two of the other deaths occurred when I was not paying attention to where I was going, wandering into rooms with pots. The fourth death occurred because I tried to run through a room that had a disco ball form up, but which devolved as I ran through.
One note: forget the names but you will see a lot of the angel forms floating around in rooms you have to go through. No aggro whatsoever (at least to 75).
Now, on the the last 2 fights and my ring :)
Edited, Jul 9th 2008 11:43am by CRJR
10 posts
I did this with some of the Leet playes on my sever.. One is probly the best pld and pandy which is a Jp,,, need less to say, we phail cuz of langage diff,, which come to my final throught.. even thou you have the best ppl to help you.. don't mean jack if you can speak the same lang. btw,, pt set up (blm/rdmx2 pld/war, brd,war,sam) killed the blm pots, but time ran out for us due to other ls events
The first 2 parts of this are easy to solo. The first part seemed harder than the second to me.
First Part (Race specific Towers): I couldnt figure out the aggroping pattern for the spinning pots. Every time I though I had it, it semed like it changed. I found the easiest thing was to take my thf and flee from the first aggro all the way to the teleport. Once up, I waited for the timer to reset and did it again. It made the trip a lot easier for me, since I dont think the pots cast spells. After I got to the top, I used my Tavnasian Ring to get out for part 2.
Second Part (The 2 Brands): This was one of the easiest things in awhile. Bring Reraise, because chances are, you will die at the Spinning Pot Gauntlet. I got my RR up and just kinda ran through planning to die. Since I had trouble timing 1 pot, I didnt want to bother timing 2 or 4 at the same time. Once you get back up and go up to the second level, this is cake. The trick to this is Patience. Eait for the disco balls to be in ball form before running. If you do that, then you will have no problems of aggro. You can easily walk from 1 Brand to the other using the map that is in the guide above. Once you have your light and both Brands, you can warp out and join a group for the fight.
I havent done the fight yet, but I just finished these 2 parts, and wanted to give some extra input on how easy the first 2 parts can be if you just wait for the opertune moment.
***Edit***
You lose all Buffs and TP upon entering the BC, so no need to waste time doing that before entering.
This fight is hard. The difficult part is that the fighting area is the size of the spinning pot gauntlet on the first floor.
I am going to reiderate what most everyone has said. Kill the 2 blm pots (the small ones) first. They can spam -ga spells which hit very hard. If you know you will wipe, wipe along the wall in a group. If you do plan to do the kill, wipe, kill method. you have to take out the 2 blms first. If you wipe before they are both dead, then you will be fighting 3 fully healed pots with half the time remaining. Wiping a second time is almost guaranteed to make you run out of time. We fought while weakened after the second wipe because of low time, and we usually ran out of time around 50% health on the 4th pot.
This fight definately sucked... but, keep at it, and you too can win. after you try for 2.5 hours, you find a pattern that works and just make it work faster.
Edited, Jan 6th 2008 11:38pm by AnimalOnSylph
lolgaxe wrote:
Thinking outside the box is fine, but the owner's manual is on the inside.
I did this as a summoner and it was incredibly easy. If I managed to get aggro, carby would attack and get their attention - then I would sic him on anything else in my way and run to the teleporter.
I even made it past the 4-pot trap room without aggro! I got eeeeeverything done without a single death, and then died trying to help another party member through their path ><.
I even made it past the 4-pot trap room without aggro! I got eeeeeverything done without a single death, and then died trying to help another party member through their path ><.
can people who done the BC help?
Or do they have to get the two brands?
Or do they have to get the two brands?
Scholar
23 posts
Yea, all buffs are dispell once you enter the BCNM.
We killed this easily with Zero Deaths.
Nin, Nin, Rdm, Smn, Blm, Blm
Kill order was Blm > Blm > Rdm > Rdm
We killed this easily with Zero Deaths.
Nin, Nin, Rdm, Smn, Blm, Blm
Kill order was Blm > Blm > Rdm > Rdm
This is far easier than others make it out to be. I was able to do all of this with 2 deaths, and those were scouting not actually getting the items. It is best done as ninja during the night or thf or any job with shadows. Take your time on the first floor, its quite long but not too difficult. On the 2nd and 3rd floors, i simply planned out where the exit was on the map, cast shadows (nin/war), and ran to the teleporter with ninja boots on. The +movement speed allowed me to get to the top without being hit once. Thf could use flee in place of the boots, the floors are very very small. The mobs will catch up quickly, so its best to start hammering on the teleporter and go through the menu the second you can. Mobs DO NOT follow you up through the teleporters. At the end of the 2nd and 3rd floors is a pot that rotates fairly quickly, i was not able to get by them without aggro, but i timed its strikes so that i got up the tp without being interrupted, took no damage thanks to shadows.
The brands: Very simple, only grah to worry about doing these, and one pot toward the end of the dawn brand run. The only thing i wanted to point out, is that it is NOT teleporters your looking for here! I ran around far longer than i had to looking for a telepad. What you are looking for is actually displacements, just like the ones in Riverne. No one has mentioned this so thought id save others the confusion. Good luck!
The brands: Very simple, only grah to worry about doing these, and one pot toward the end of the dawn brand run. The only thing i wanted to point out, is that it is NOT teleporters your looking for here! I ran around far longer than i had to looking for a telepad. What you are looking for is actually displacements, just like the ones in Riverne. No one has mentioned this so thought id save others the confusion. Good luck!
God damn it do I f*cking hate this zone.
"Which side of the jugs aggros, the ornate side or the eye side?"
"The eye side."
*dies without RR*
"Actually.. it's the ornate side."
"Which side of the jugs aggros, the ornate side or the eye side?"
"The eye side."
*dies without RR*
"Actually.. it's the ornate side."
Fighting the BLM pots first is not necessary....they dont spam tierIII agas or tier IV spells all the time...the RDM pots are the most challenging in this fight to be honest..we just zerged them (Melee 2hrs) since they do not regen life. The BLM pots (when they were awake) casted mainly tier I spells, and only did a few agas here and there, but a simple Curaga II or III nulified that. As a RDM/BLM...I even kited a BLM pot away from the group with ease if one of our members missed a group ES sleepga.
The BLM pots also seem to have less life (but regen life if they go back to their homepoint), so killing them quick in the end without having to outright zerk them made more sense to us. Ive done this fight 6 times, and each time, killing the RDM pots first got us through with minimial deaths (Melee taking an Optic Induration) and 0 wipes to this BC with a confident set up.
NIN/WAR SAM/THF WHM/BLM RDM/BLM BLM/WHM BLU/WHM... just take 3 ES sleepers and 3 Melee and this fight should be a breeze.
edit. Spelling
Edited, Apr 4th 2007 1:56pm by trypstorm
This can be done pretty easily without a blm. My setup was Rdm/blm x 2,Whm/blm(me),Mnk,Pld,War/nin. As long as you can get 3 ES sleepgas off, you should be fine. By the time I had to cast my ES sleepga, the 2nd blm pot was half way dead. Then afterwards we had to wipe, no problem. By the time we got back and ready to go, all the mages had their ES back so we just did the same procedure again and won the fight.
36 posts
But on the other hand they don't aggro when you enter the room, so as long as your still you can use opopo kneckless and tp stuff. I'm 0/1 on this bad boy we tried to just zerg the blm w/o sleepga, big big mistake. They cast some big boy spells in that tiny little room. Death comes swift in that room, but we wiped and rested and continued to fight but time ran out.
Quote:
First and foremost to note: Because this fight takes place within Ru'hmet, it is possible to build TP up on previous floors off of mobs and carry the TP over into the fight itself. This will (hopefully) save you the time/gil of having to buy and sleep up TP with Opo-Opo Necklaces before entering into the fight itself.
This has been disabled with a recent update; I can confirm this.
Free account required to post
You must log in or create an account to post messages.© 2024 Fanbyte LLC